·
Zendesk features
·
7 minutes
·
Updated

Joakim Tuuli
Solution Consultant
Article summary
The basic rollout of Zendesk's generative AI agents is a straightforward process, as long as the groundwork is done and the conversation logic is designed correctly. This article walks through the rollout steps from optimising Help Center articles to creating and testing the AI agent itself. It also covers resolving more complex contacts using use cases, procedures, actions and API integrations.
A guide to rolling out Zendesk AI agents
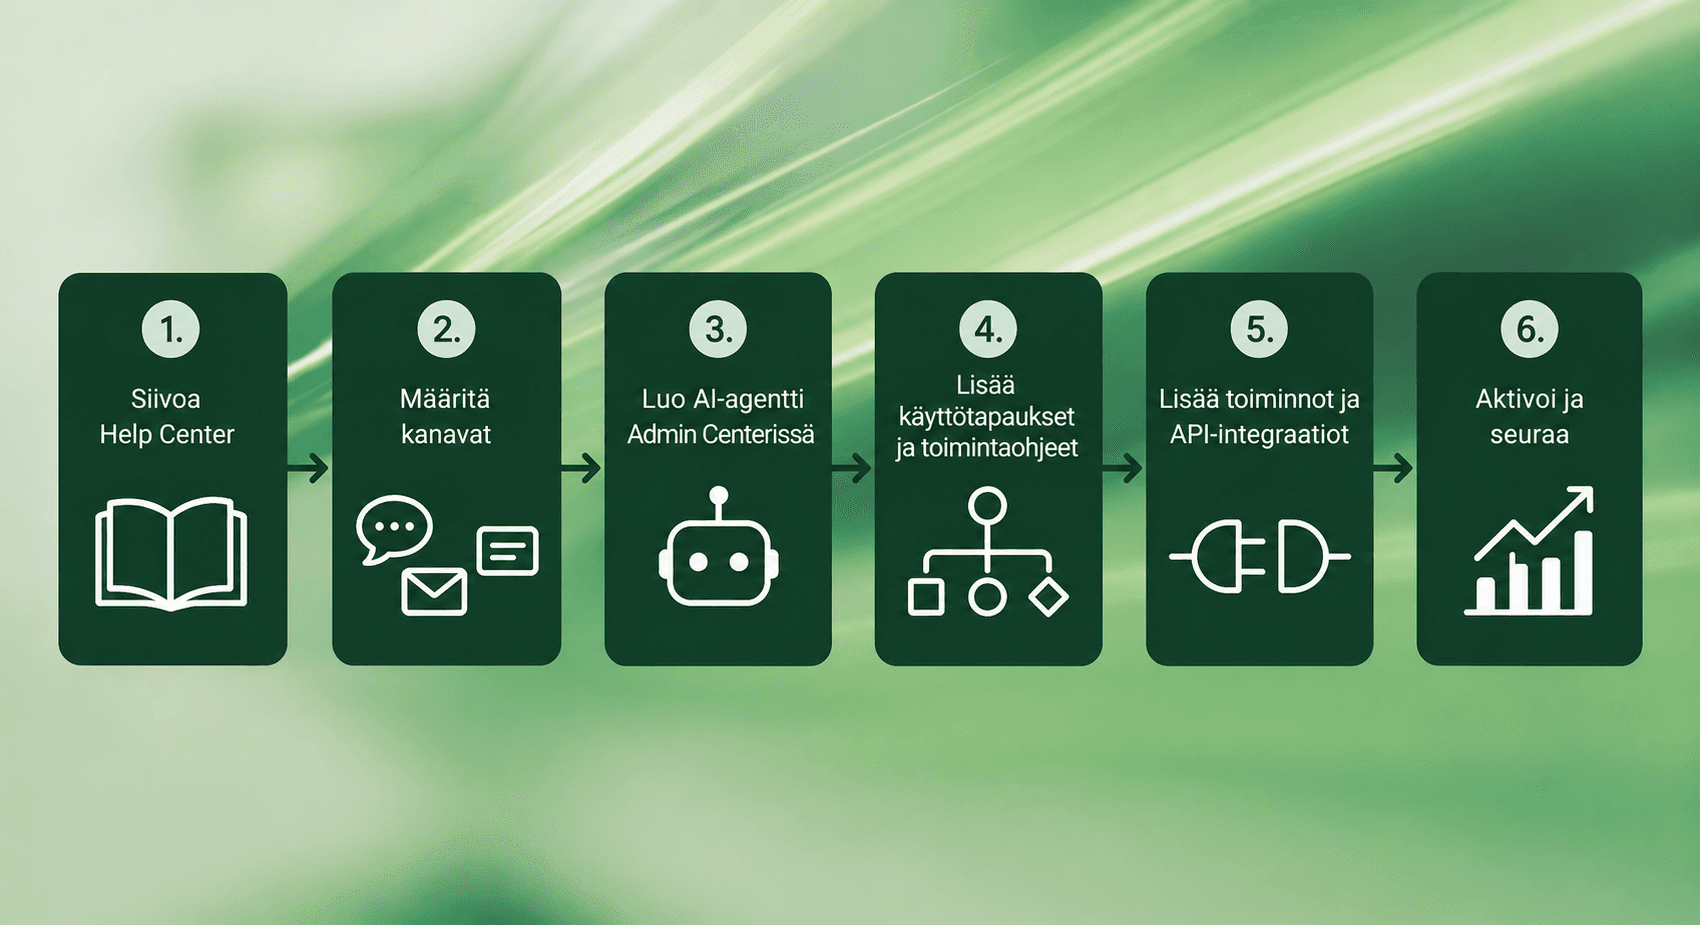
Zendesk’s AI agents often raise questions: how do they work, what does rolling them out take, and how complex is it really? The purpose of this article is to walk through a five-step path to rolling out Zendesk AI agents. Although it’s possible to build highly complex automation and deep integrations with Zendesk’s AI agents, configuring the basic setup is surprisingly straightforward. AI agents are one part of the wider Zendesk platform, which also includes ticketing, Agent Copilot and the Help Center.
Moving to the new AI-agent environment is now relevant for many existing Zendesk customers, because Zendesk is currently winding down its old rule-based legacy bots and Essential-tier AI agents.
Step 1: Get the Help Center in shape
The most important stage of the whole process — and the one almost every team wants to skip. Generative AI agents build their answers directly from the data sources connected to them. The main source for Zendesk’s AI agents is Zendesk Knowledge, plus any external databases indexed by Zendesk’s Web Crawler.
If the right answer isn’t already in your articles, the AI agent can’t conjure it out of thin air. It falls back either on fallback answers or hands the conversation over to a human agent.
Before you even touch the AI agent’s own settings, run an AI audit on your knowledge base:
One problem per article: Break long, complex “everything about this topic” articles into shorter, clearly scoped units.
The customer’s language: Write articles in the language and terms your customers actually use when asking for help.
Structure and headings: Use clear headings and lists so the language model can easily pick out the relevant information for its summary.
Read our article on how to build an AI-ready knowledge base.
Step 2: Connect the channels
Every AI agent is always bound to a single channel type. One and the same AI agent can serve messaging channels (Messaging) and another can serve email, but the same AI agent doesn’t stretch across both. So you need the messaging channel itself configured before you can attach an AI agent to it:
Messaging: The Web Widget embedded on your website, mobile apps (SDK) and social-media messengers (e.g. WhatsApp, Facebook Messenger).
Email: Email addresses and contact forms that create tickets.
API: Headless integrations for your own interfaces.
Voice: Generative solutions for the voice channel (Voice AI agents reached general availability on September 1, 2026).
Don’t confuse AI agents and Agent Copilot. AI agents are independent bots working on the front line of customer service, while Agent Copilot is an AI assistant that makes an agent’s day more efficient. Read more about Agent Copilot in this article.
Step 3: Create the AI agent in the Admin Center
Once the channels and Help Center are ready, head to the Zendesk Admin Center. Select AI > AI agents > AI agents. Here you create the actual AI agent by clicking Create AI agent.
You’ll be guided through three basic steps:
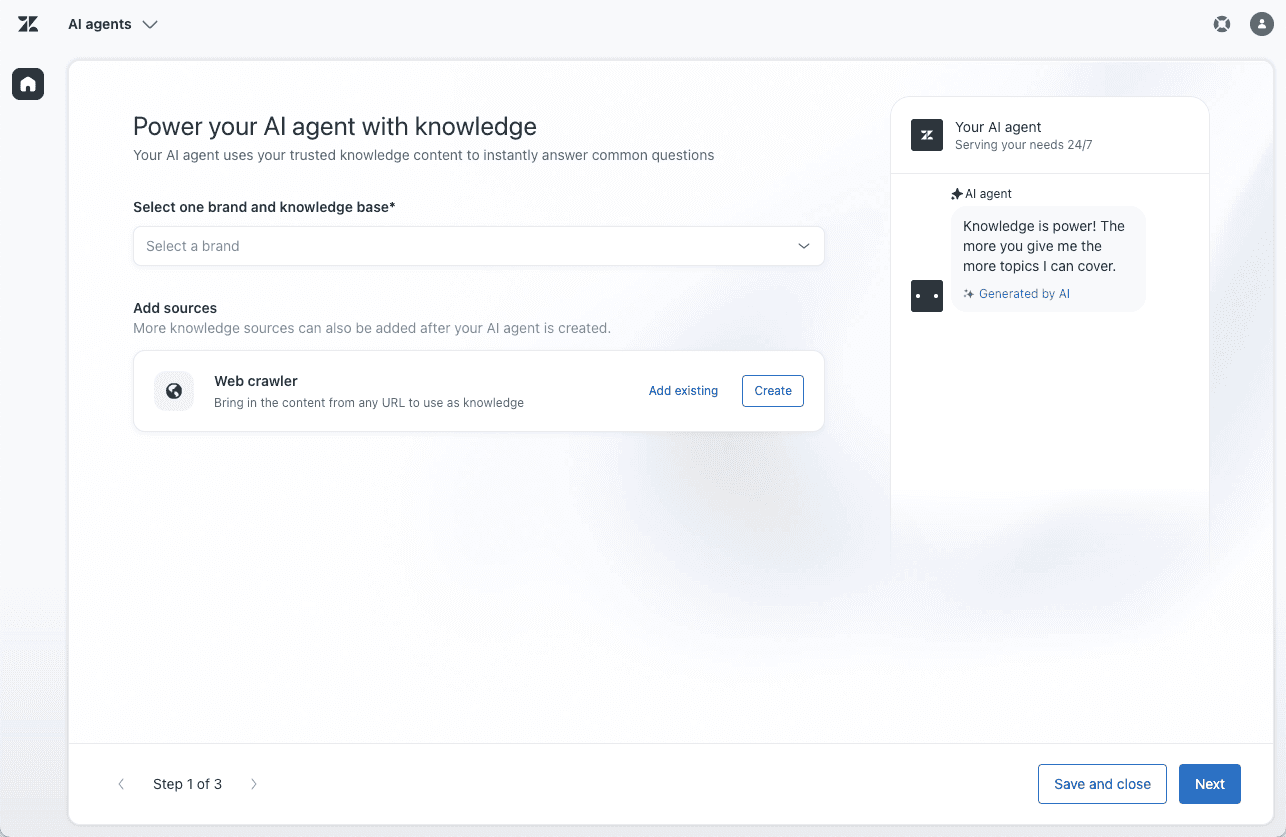
Connecting the knowledge base: Select the brand whose Help Center the AI agent reads its answers from. If you want the AI agent to also use your public website, you can use Zendesk’s Web Crawler feature at this stage to gather information from there.
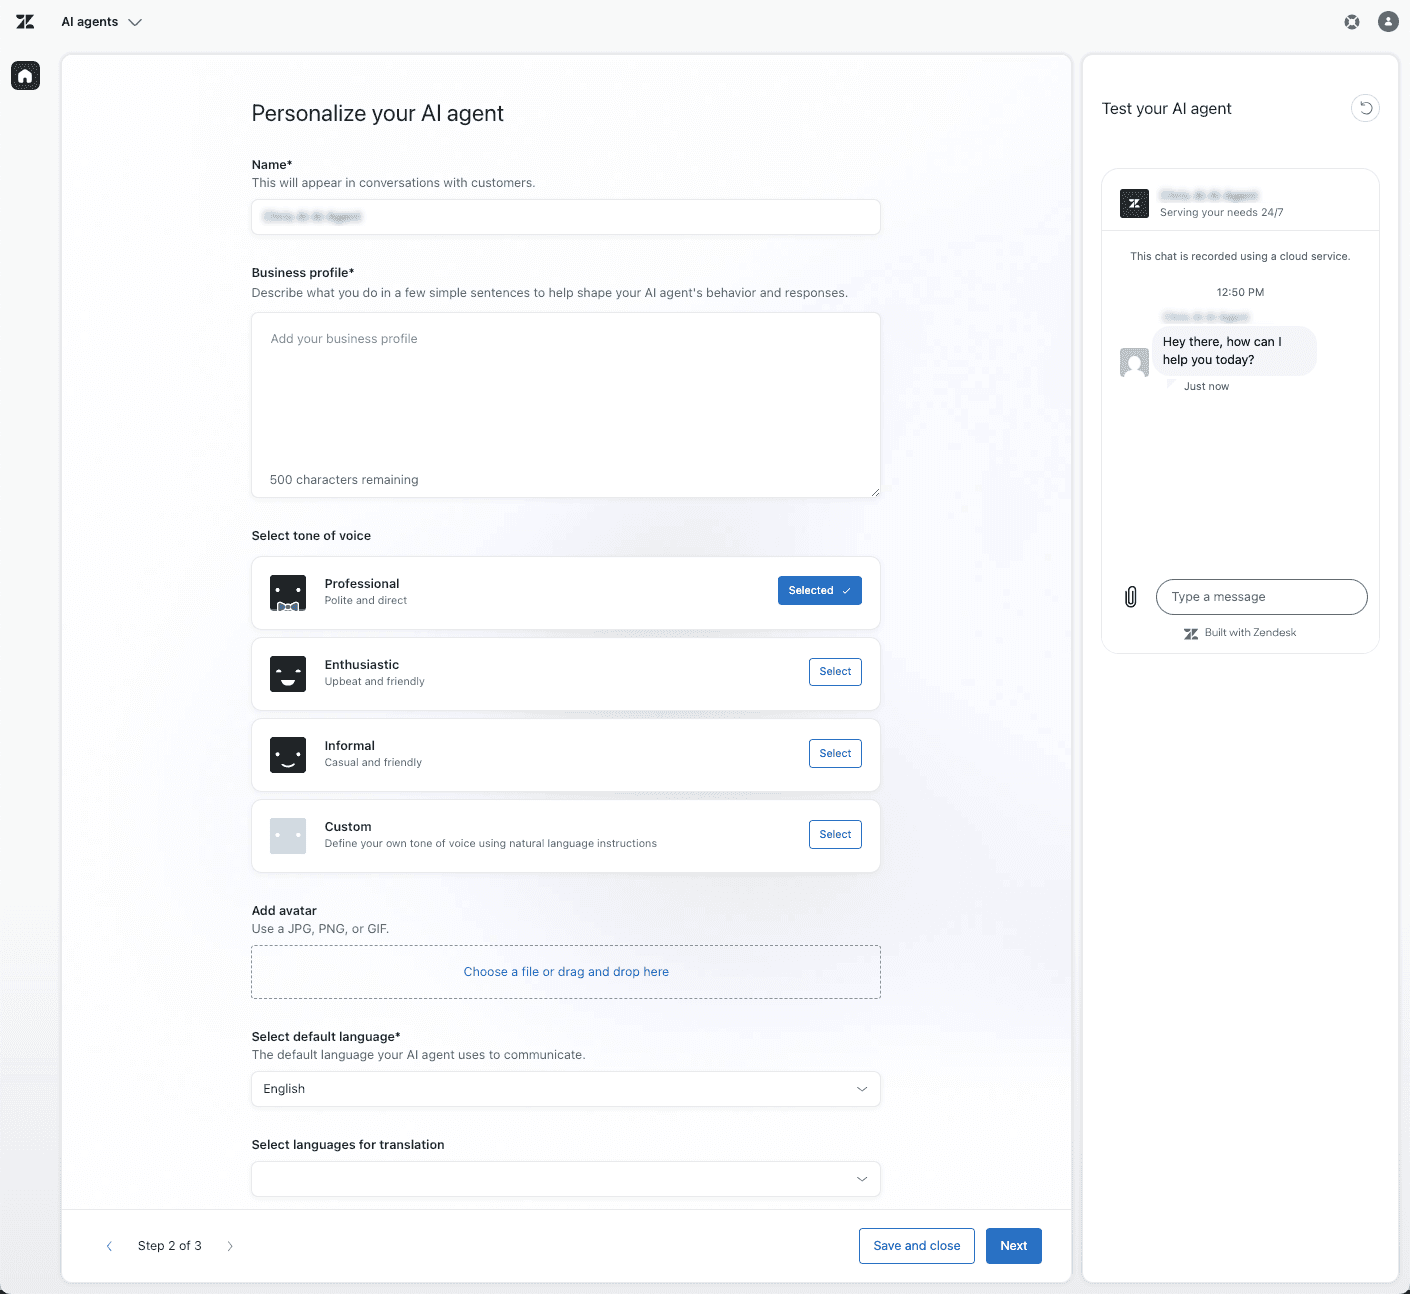
Personalize: Define the company profile, choose your desired tone of voice or create your own, and set the response languages. Zendesk’s AI agent automatically recognises and translates on the fly up to 80 different languages.
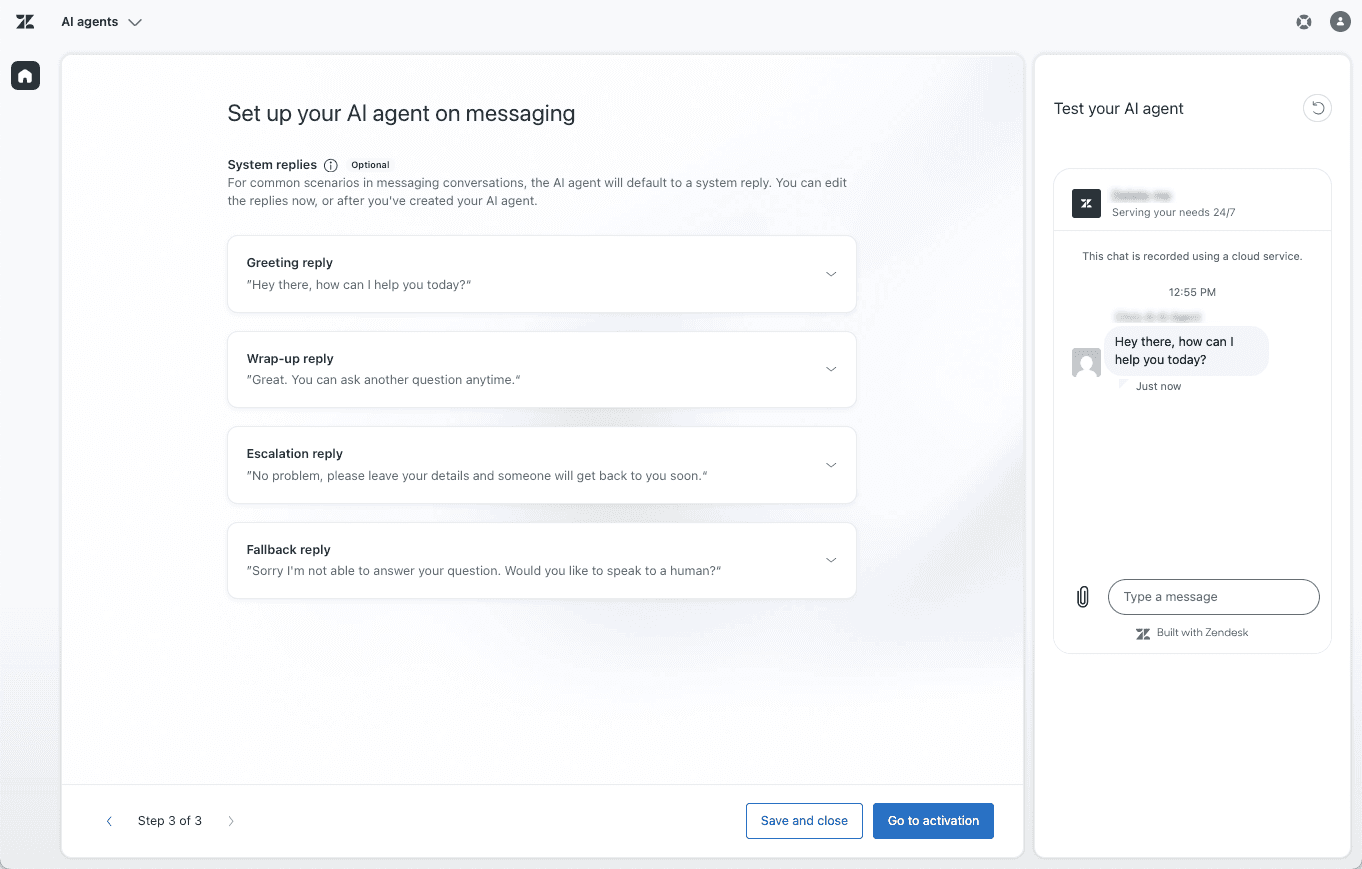
System replies: Customise the automatic welcome greetings, the resolution question, escalation to a human and the default answer for unclear situations.
Step 4: Configure the AI agent for more complex cases (optional)
Basic creation alone gives you an AI agent that can answer customers generatively from Help Center articles. But if you want the AI agent to handle more complex contacts while serving customers, you need additional configuration.
Managing the configuration (Admin Center vs. the AI agents tab): Most of the AI agent’s logic and settings (such as use cases, dialogues, conversation logs and analytics) are configured and maintained on a separate AI agents tab (the former Ultimate Dashboard). However, you can now also use the Admin Center’s Custom actions and Action flows directly with the AI agent. If you want to use the same integration for both the independent AI agent and the human-supporting Agent Copilot, it’s best to create the API connection directly in Zendesk’s Admin Center, so it’s available to both without duplicate work. We wrote an article about Custom integrations here.
All other maintenance related to the AI agent’s conversation logic, quality and analytics is done on the AI agents tab found in Zendesk’s sidebar:
Create use cases to identify customers’ requests
For the AI agent to help customers as efficiently as possible, you need to define use cases for it. Use cases let the AI agent understand what a customer’s question is about and connect them to the right procedure or dialogue. Use cases are, in practice, the topics customers need help with — such as order returns or refund requests.
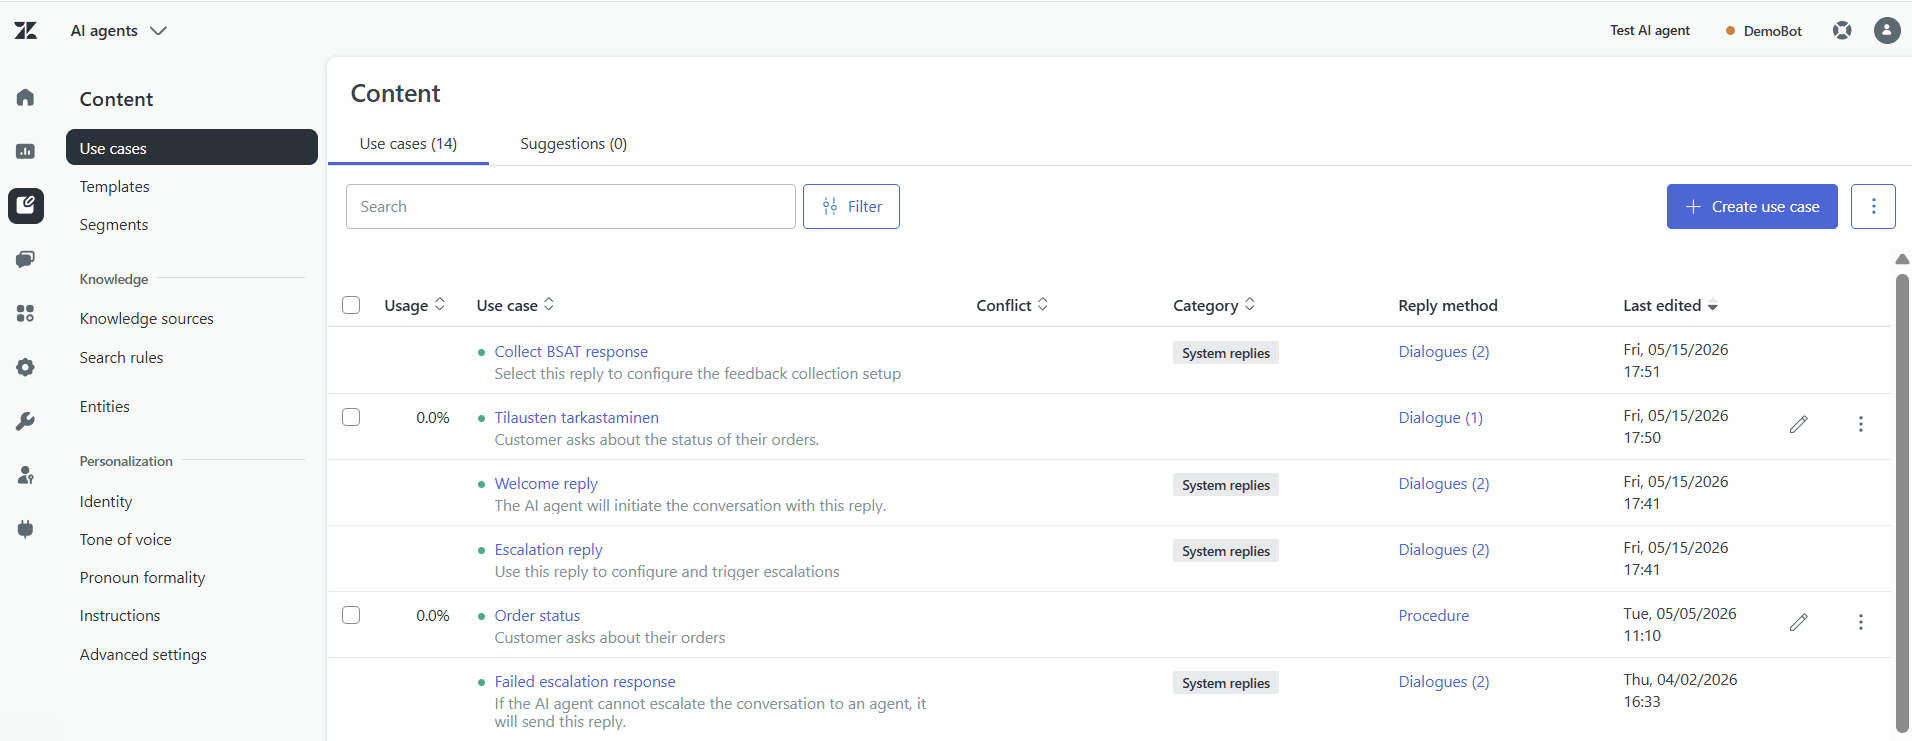
If you don’t create use cases, the AI agent answers questions purely on the basis of the data sources (such as Help Center articles), and it can’t use procedures or dialogue paths.
Create generative procedures or dialogues to guide the answers
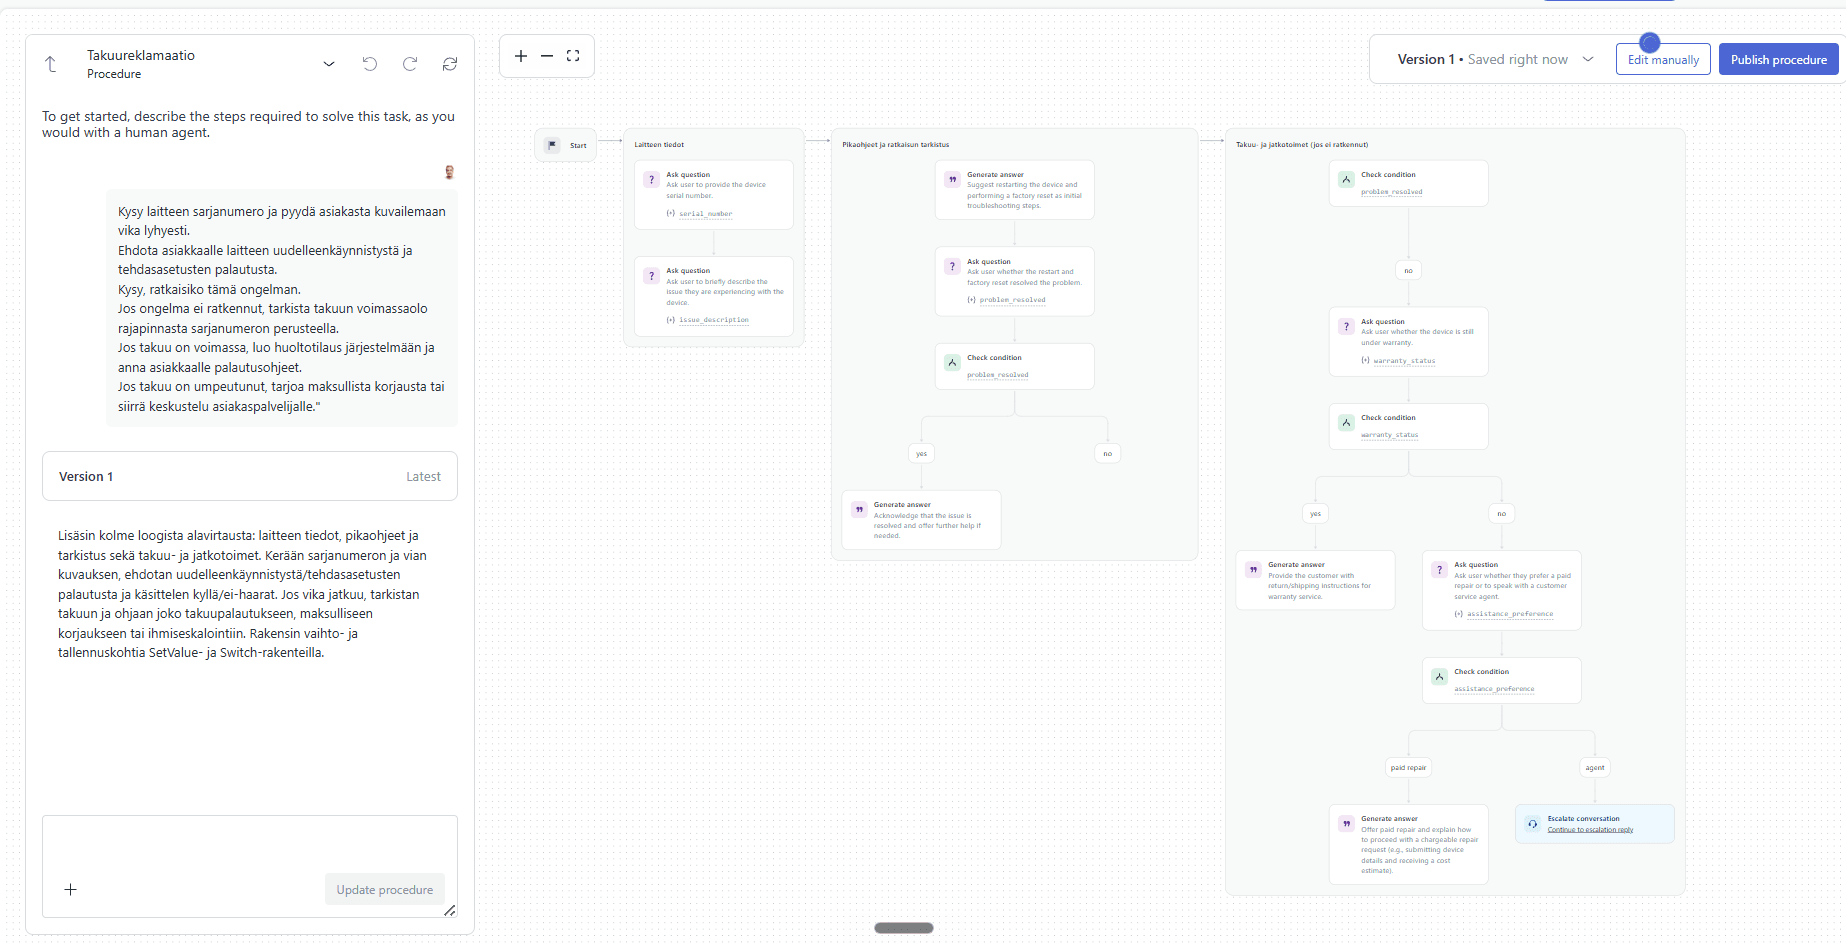
After creating use cases, you define the conversation flow for each topic. To guide the conversation you can use either a more flexible generative procedure or a pre-scripted dialogue.
Generative procedures are instructions that progress flexibly towards a goal, where you define the rules and the information to collect. The conversation adapts on the fly to the customer’s answers.
Alternatively, you can create dialogues that let the AI agent answer customers’ requests according to hand-scripted dialogue paths. Dialogues use more tightly defined, branching logic to determine the AI agent’s answers and actions during the conversation.
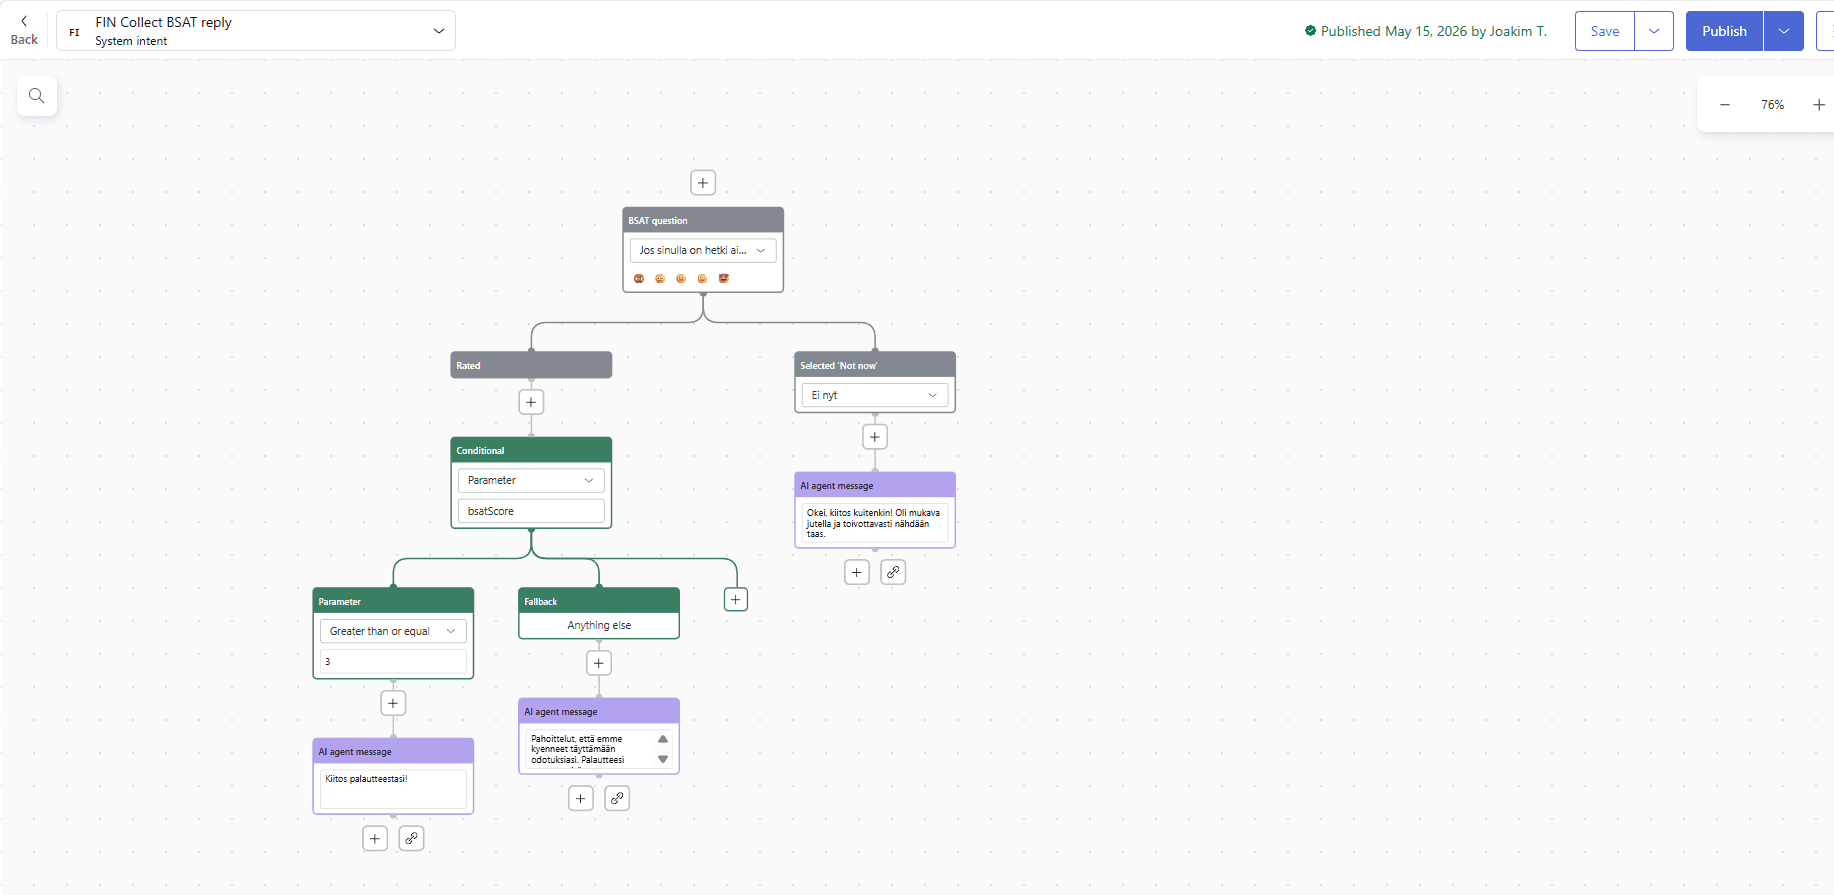
You can decide for each use case separately whether it triggers a procedure or a dialogue. Procedures require less work to set up and less maintenance, but offer less direct control over individual details. Dialogues, on the other hand, give full control over the flow of the conversation, but building and maintaining them takes more work.
Add actions, entities and API integrations to raise the automation rate
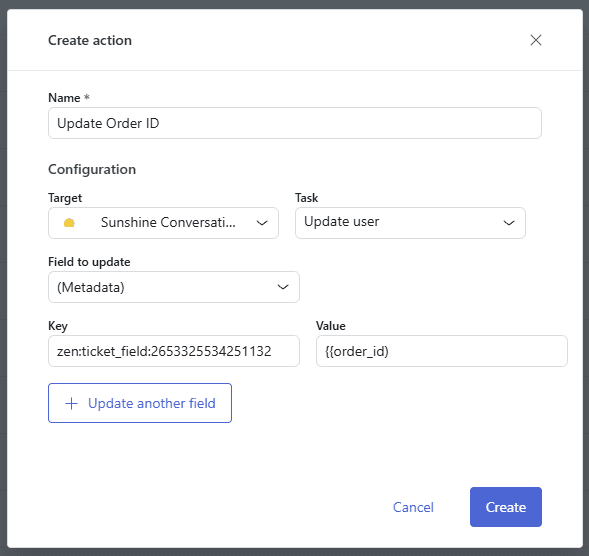
Actions (Configured actions): Here you define how the agent handles the conversation’s data. For example, you can create an action that saves the parameters collected during the conversation (such as the order number) and automatically moves them into Zendesk’s ticket fields when escalating to a human agent.
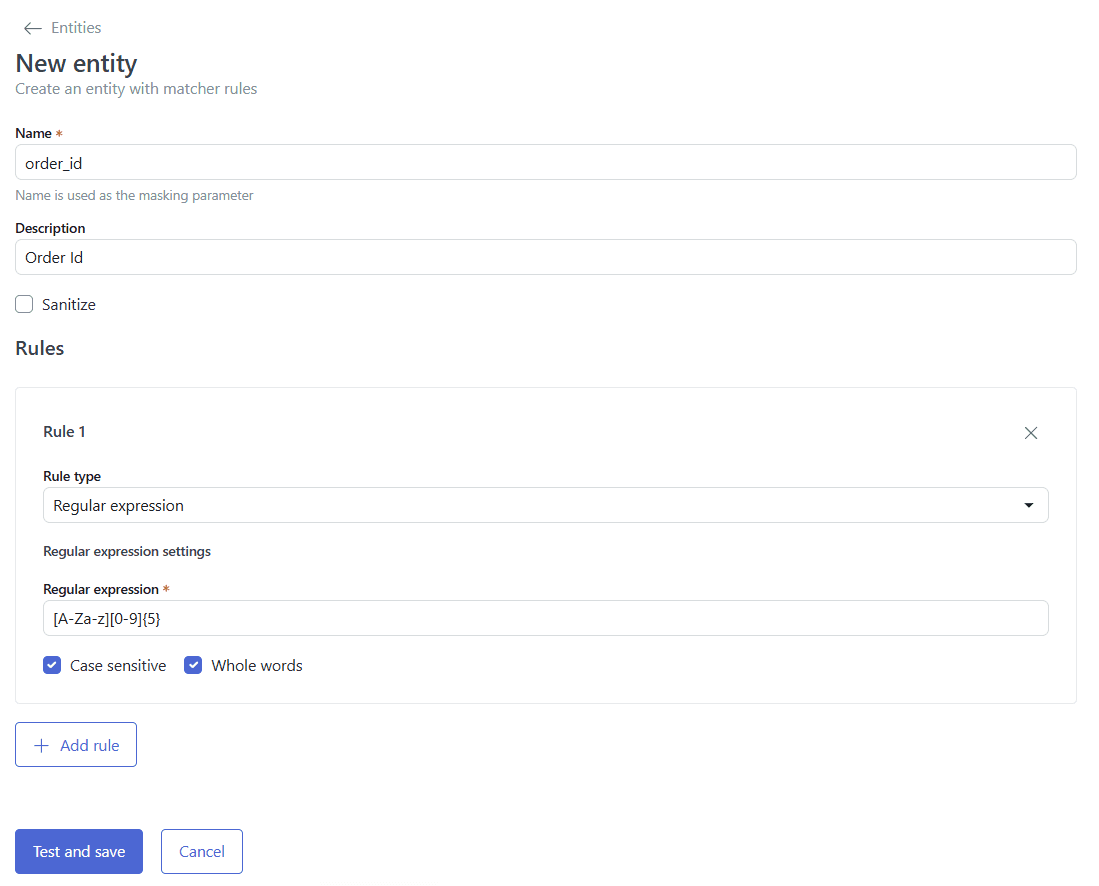
Entities: Identify and extract information from customers’ messages (such as an email address, order number or IBAN) into parameters and for cleaning up PII data.
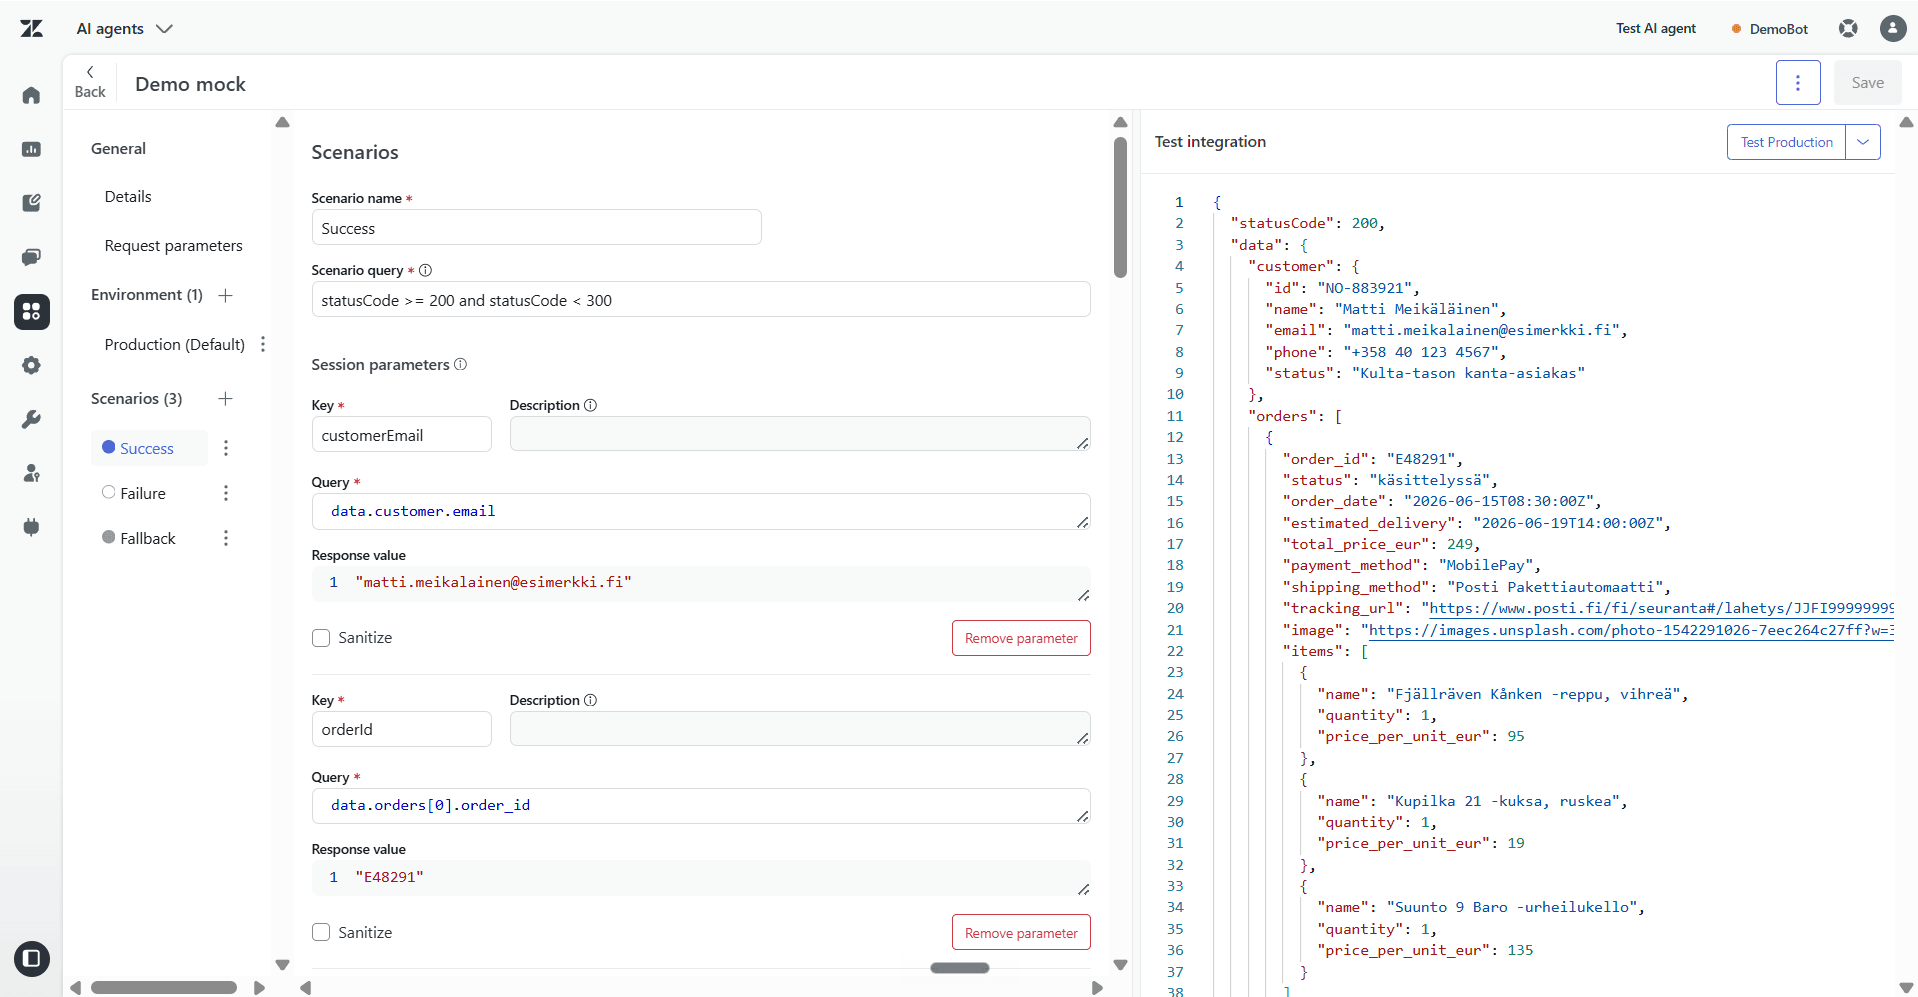
Integration Builder: The AI agents platform’s own low-code tool for building API connections and defining different response scenarios (e.g. Success, Failure, Fallback). The tool supports separating Sandbox and Production environments, several authentication types (Basic Auth, Bearer Token, OAuth 2.0) and transforming data into session parameters using the JSONata query language.
Fine-tune and test
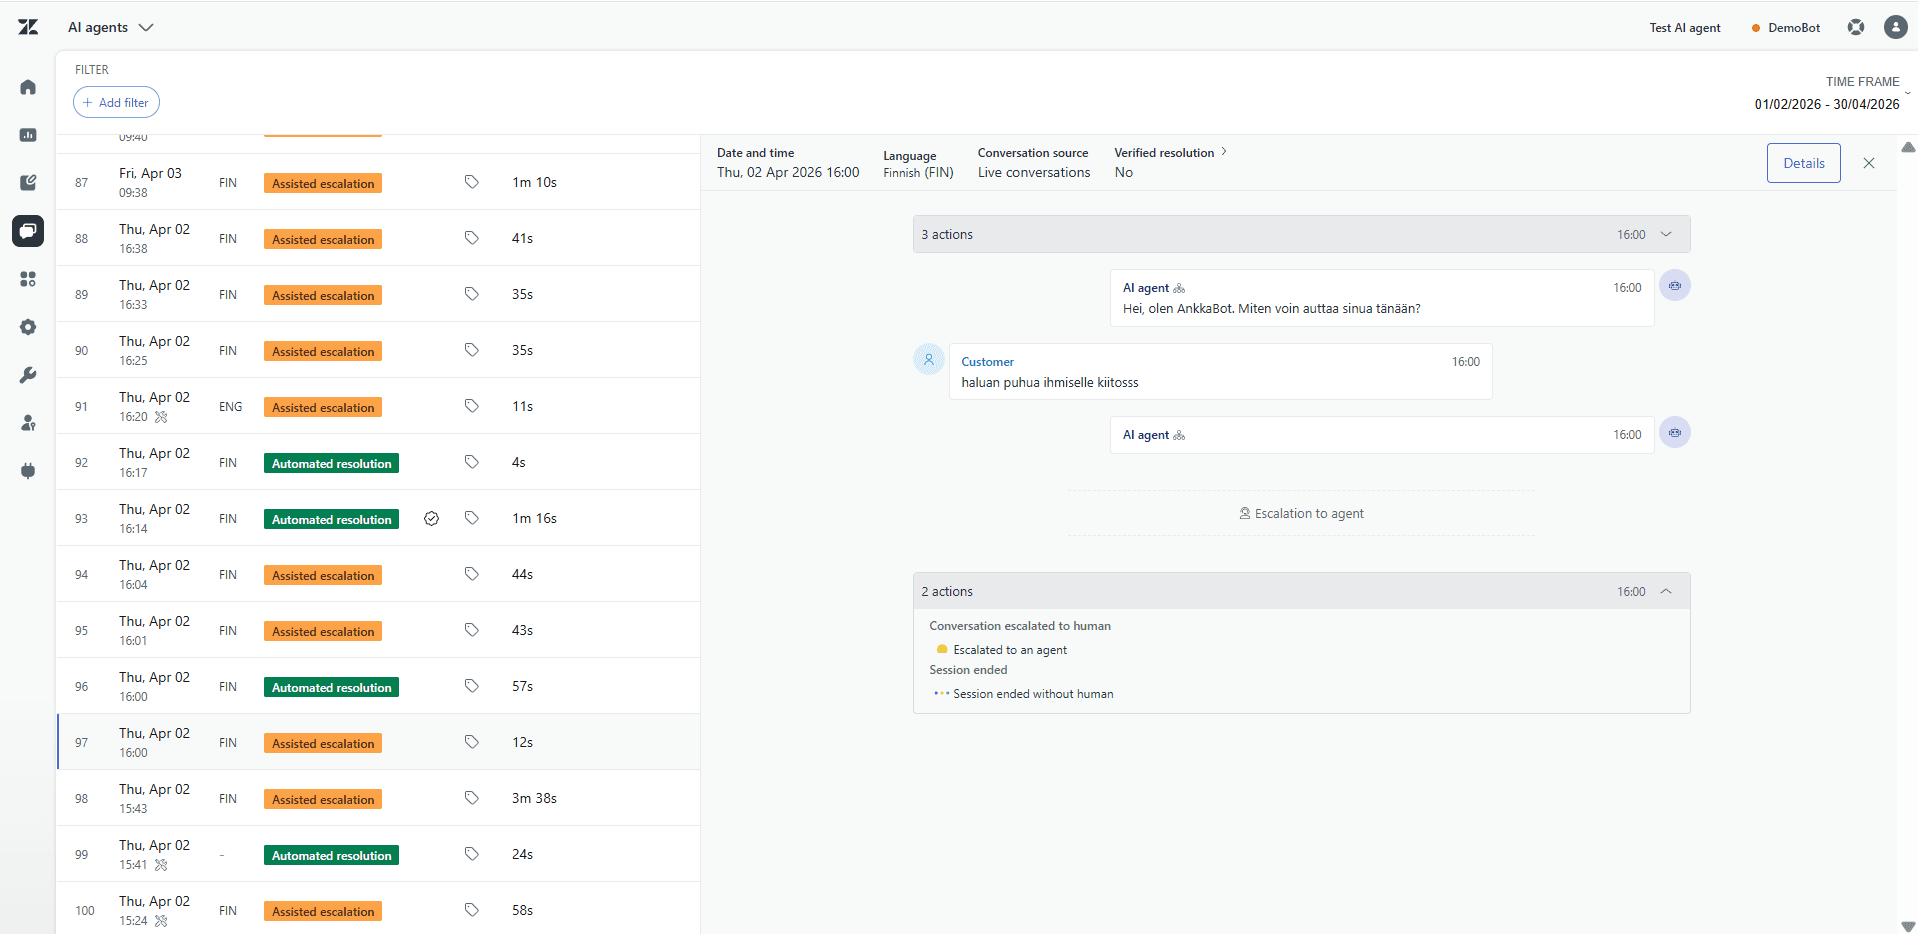
Before publishing, it’s extremely important to use the conversation logs for testing. The logs let you see how the AI agent interprets customers’ questions, which use case it chooses, which API calls fire and where the conversation might break down. You can also use the Test AI agent tool for quick tests.
Avoid builder bias. Don’t let the AI agent’s builder be the main tester — bring other team members into the testing too (with fresh, impartial eyes).
Step 5: Activate and start monitoring
When you’re ready, select the channels or email addresses you want to connect the AI agent to, and activate the AI agent in production.
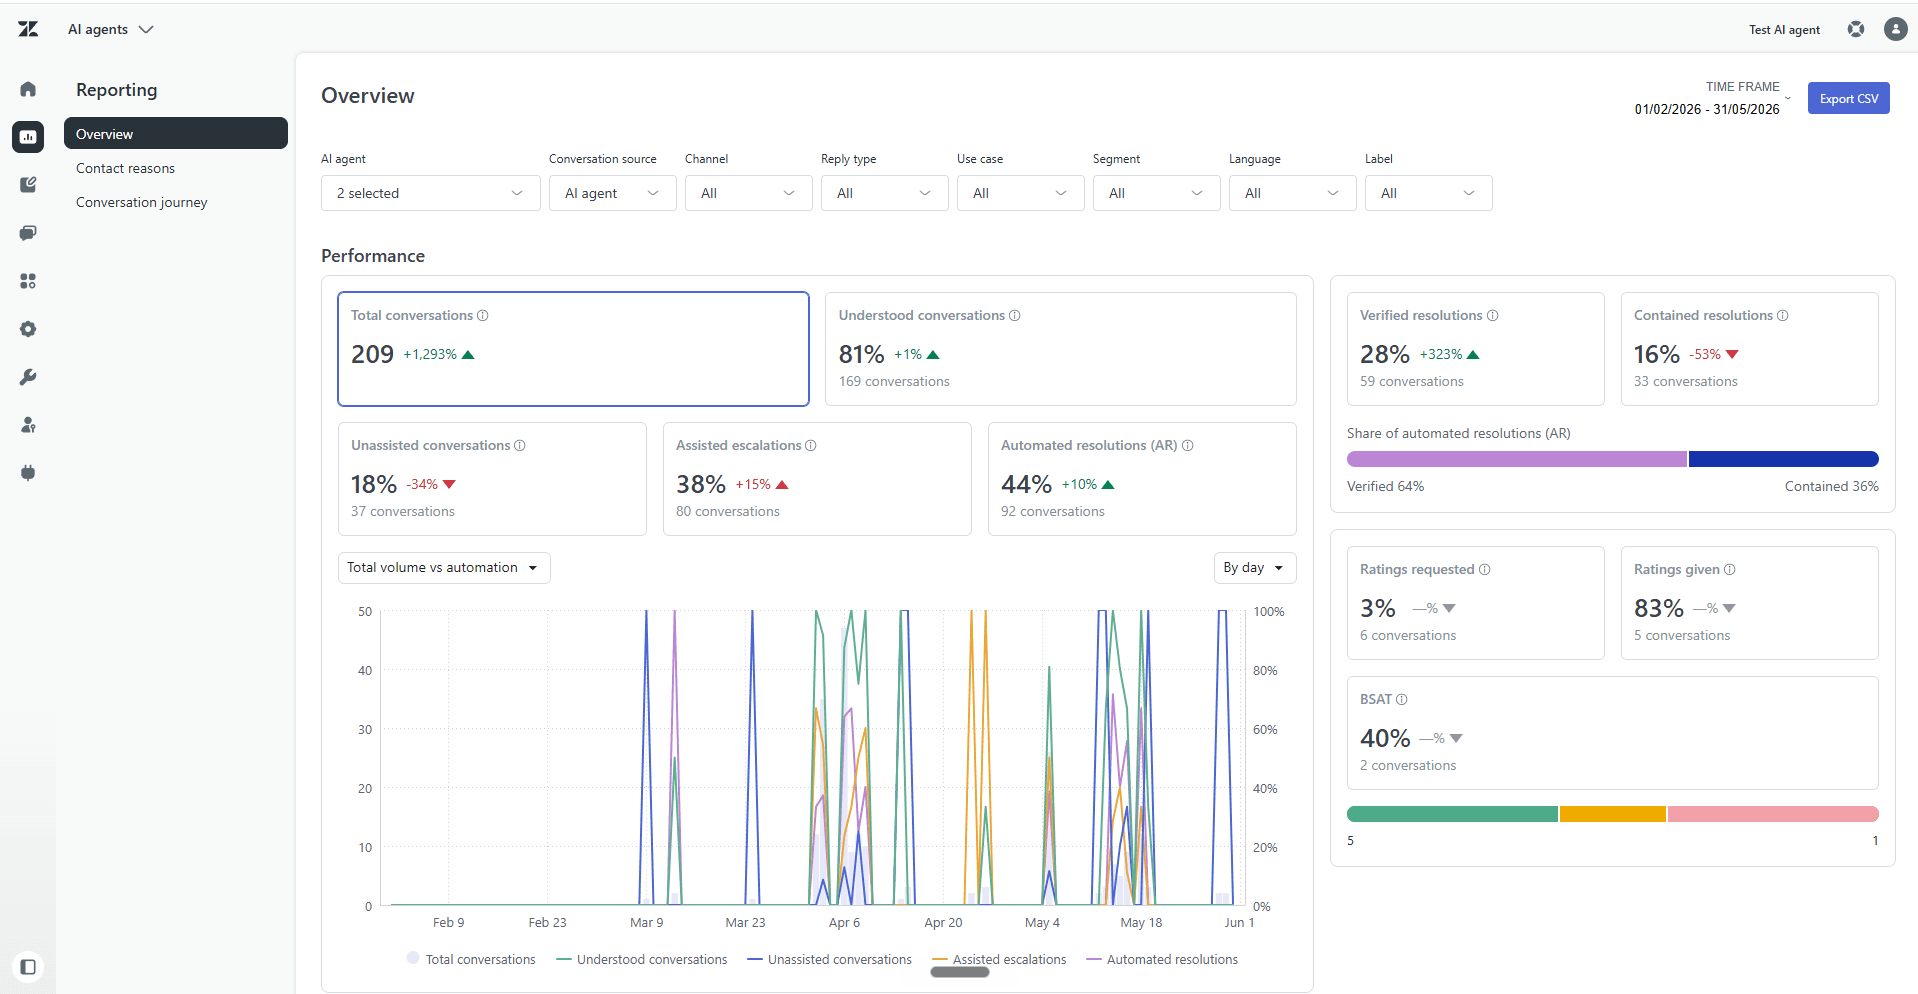
After publishing, you move to monitoring, which happens in the Reporting section of the AI agents tab. The analytics report shows, among other things, the automation rate, the number of understood conversations, escalations to humans and the CSAT satisfaction ratings customers give, plus a chart of conversation flow.
Two golden rules of monitoring after rollout:
1. Let the data accumulate. Wait at least 48 hours of real customer traffic before drawing any conclusions from the reporting figures. Samples that are too small lead to hasty changes.
2. Manually read through the AI agent’s first ~500 completed conversations. Reporting shows you the cold numbers, but only by reading the conversations can you spot tone deviations, clumsy word choices or possible misinterpretations of your company’s rules.
Do you need help rolling out AI agents?
While these instructions get you off to an excellent start, getting the full benefit requires careful planning even before the rollout begins. If you need advice, support or a partner to spar with on getting the most out of Zendesk’s AI agents, Zennius is here to help.
Our team features Zendesk’s former AI consultant — read more about Mika Mikkola joining Zennius.
Zennius is an AI-expert-certified Zendesk partner, and our team has experience from over 100 Zendesk AI rollouts. We’re happy to help you design and optimise your AI solutions so they serve your specific business.
Book a short remote meeting directly from our calendar here — let’s spar together on AI agents that deliver real business value for you!
Frequently asked questions
The most important step is getting the Help Center in shape. Generative AI agents build their answers directly from the knowledge sources connected to them, so if the right answer can't be found in the articles, the AI agent falls back on a fallback response or hands the conversation over to a human support agent. Run an AI audit of the knowledge base before you touch the AI agent settings: break long articles into shorter ones and write them in the customer's own language.
No, the same AI agent can't handle both email and chat, because each AI agent is always tied to one channel type. One AI agent serves messaging channels and another serves email. The supported channel types are messaging (Web Widget, mobile apps, and messaging apps such as WhatsApp), email, API-based headless integrations, and voice.
Use cases are topics customers need help with, such as password resets or billing questions. They help the AI agent understand what the customer's question is about and connect them to the right procedure or dialogue. Without use cases, the AI agent answers based only on the knowledge sources and can't make use of procedures.
Choose either a procedure or a dialogue for each use case, since each is triggered separately. Procedures adapt to the conversation on the fly and need less maintenance, while dialogues give you full control over the flow of the conversation. If you choose a procedure, you can still embed a dialogue template (embedded template) at points where exact wording is needed. The embedded template hands control back to the procedure afterwards.
Monitor the AI agent's automation rate, the number of understood conversations, escalations to humans, the BSAT satisfaction ratings given by customers, and the conversation flow chart. All of these can be found in the Reporting section of the AI agents tab. Wait for at least 48 hours of real customer traffic before drawing conclusions, and also read through the first 500 or so completed conversations manually.